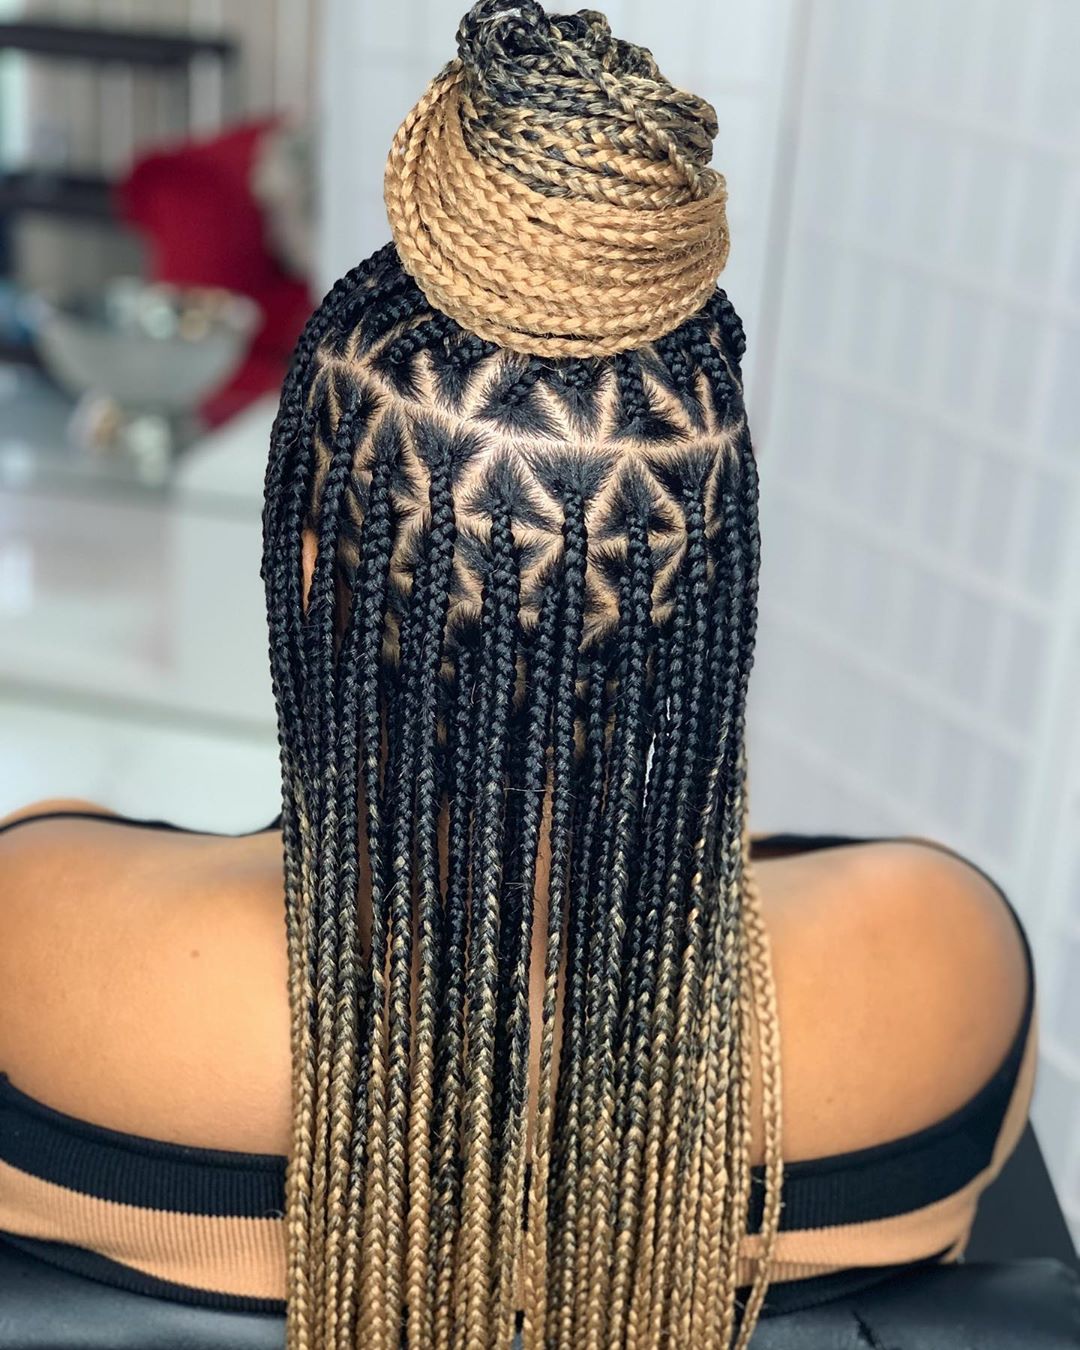
Knotless Box Braids
Though currently taking the Black hair world by storm, knotless box braids first began to come into focus in 2014, making it the year of revamped protective hairstyles.
The style first started to gain popularity in urban cities like Atlanta and Los Angeles, and interest has steadily spread over time. A variation on traditional knotted box braids, knotless box braids arose out of the need for gentler protective styling options for black women.
How to do knotless box braids | beginner-friendly by Tiffani Renae
Photo credit: @lcbeautysalonllc
Shine N Jam Conditioning Extra Hold With Honey,16 Ounce
What Are Knotless Box Braids?
Knotless box braids are a version of the tried and true box braid hairstyle. The style mainly differs in the method of which they are installed.
The traditional knot used to secure the braids at the root is swapped out for a traditional plait with a feed-in braid technique to extend and thicken the braids. This method makes for natural braids that look to be growing directly from your scalp.
Knotless Box Braids vs. Regular Box Braids
The technique
While knotless box braids are a variation of regular box braids, they are very different than the former. For starters, there is no bulging knot sitting on the scalp at the base of each braid. Instead, each braid base is flat and appears to be coming straight out of the scalp.
A feed-in technique is used. As such, the braiding hair is added to the client’s hair in smaller pieces, resulting in a flat-lying plait that is not as heavy on the scalp as regular box braids.
Less tension on the hair
Knotless box braids also do not place as much tension on your hair. You can style your hair in updos as soon as they’re installed without having any pain. Regular box braids may require you to wait a few days for them to loosen before styling.
Cantu Shea Butter For Natural Hair Moisturizing Twist & Lock Gel
Price
Another great thing about knotless braids is that you’ll save money on hair. They do not require as many bags of hair as for regular box braids. You can almost cut the bags of hair you’ll need to buy in half.
Often 3-4 packs of hair can be more than enough depending on the size of the braids you’re hoping to achieve. Although the braiding hair may cut back on some cost, you could make up for it in installation fees.
Since knotless braids have risen in popularity, they may cost more to install than regular box braids. Where traditional box braids might start at $150, knotless box braids could begin at $200 and go up in price.
Knotless braids are typically priced $50 to $150 more than traditional box braids.
How to do Knotless Box Braids?
Easy Knotless Box Braid Tutorial
Doing knotless box braids may appear to be daunting if you’ve only ever known the traditional method. However, if you can do feed-in braids, the technique should come quickly to you.
There’s no better way to learn a new method than to try it out if you can’t. Even if it takes you a few tries, learning to do knotless box braids is not impossible, and if you are a stylist, learning to do them can bring in a nice stream of income as they are heavily requested at the moment.
To successfully install knotless box braids, you will need:
- A rat-tail comb
- A brush
- 3-4 packs of extension hair such as Kanekalon, X-Pressions hair, or human hair
- A moisturizer and/or styling gel of your choosing, and edge control.
1. Prep your hair
This step can be crucial to the sleekness of the style and your natural hair’s health in the braids. You’ll want to wash, condition, and moisturize your hair.
Most stylists will prefer your hair to be blow-dried as well as it will make parting and braiding easier. It will also help with reducing pieces of your natural hair sticking out of the braids at all.
You can also prep your braiding hair into sections during this step. Make the pieces based on the size of the braid you want to obtain. It’s best to start with smaller pieces and feed in larger pieces as you extend the braid for a more natural and gradual effect.
As I Am Coconut Cowash Cleansing Conditioner 16 oz.
2. Part your hair
Part your hair into the number of parts you want. You can use your edge control to make your parts crisp and defined.
3. Take a section of hair and separate it into three parts
Begin by tightly plaiting once or twice down and then add in the smallest piece of braiding hair you’ve previously separated.
Braid one or two more stitches down and then add the next piece of hair. Braid a few more stitches down and then add another piece of hair.
You can add as many pieces as necessary to achieve your desired thickness and length. Typically, tutorials will add 3-4 pieces of hair. As you’re braiding, remember to add and edge control or pomade to your natural hair. This will help with blending your own hair into the braiding hair so that it won’t stick out of your braids.
4. Braid down
Once you’ve added the desired pieces of braiding hair to your braid, keep braiding down the extension hair’s remaining length.
5. Seal the ends
Once your full head is completed, you need to seal your ends. Boil or microwave a large container of water. Make sure you have a towel in hand while doing this.
In 2-4 sections, carefully dip your braids’ ends into the hot water and dry them off with the towel as you go. Now your ends are sealed, and your braids should be less stiff as well.
How to Care for Knotless Box Braids?
Knotless Braids Maintenance: Scalp Care & Night Time Routine
Seeing as knotless box braid hairstyles usually last for about 4 to 6 weeks, having a plan for maintaining this style is crucial to ensure its longevity. Luckily for you, maintaining this style can be done in 3 simple steps!
The first step to guaranteeing long-living knotless box braids is to keep the scalp hydrated throughout your installation of them. To do this, it is best to oil the scalp once or twice a week.
Using hair oils like Wild Growth, which promote hair growth on top of providing much-needed moisture to your hair and scalp, is definitely the way to go.
There are additional measures you should take to assure that your hair stays hydrated under your knotless box braids. For one, using styling mousse around the hairline will not only show some moisturizing love to your edges but also help to preserve the overall neatness of your hairstyle.
You should also consider using a braid spray on your knotless box braids as needed. African Pride Braid Sheen Spray comes highly recommended for moisturizing your hair while wearing braided or twisted protective styles.
The next step to maintaining your knotless box braids involves creating a nighttime care routine—a vital yet easily neglected step when attempting to keep up your knotless box braids.
You should always wear a silk or satin scarf and/or bonnet, whether you are just taking a little cat nap or turning in for the night.
The smooth texture of satin and silk help to keep your braids looking fresh while also protecting your edges and not drying out your natural hair. Consider using a jumbo bonnet for longer hairstyles like knotless box braids.
The last step to maintaining the basic upkeep of your knotless box braids is to regularly redo your edges. After tugging at your edges with each new hairstyle you make out of your knotless box braids, the braids in the front may begin to look old and worn out.
A quick fix is to use strong-hold edge control to lay down your edges, giving the illusion of fresh braids.
It is important to note that when using a product to either moisturize your natural hair or redo your edges, be sure not to use too much too frequently. Doing so will cause build-up to start to accumulate, making your knotless box braids look old and worn out.
Knotless braids
Are Knotless Box Braids Versatile?
Knotless braids can be very versatile. They can be done in many sizes such as small, medium, and large. Medium knotless braids and large knotless braids are trendy sizes.
Knotless braids can also be put into fun hairstyles. You can create fun updos like ponytails, buns, and half-up-half-down styles.
Their versatility doesn’t end there. They can also be installed in any braiding color ranging from traditional colors to more vibrant colors from the rainbow.
How Long Do Knotless Box Braids Last?
By following our aftercare instructions, your knotless braids can last for 4-6 weeks.
Who Are Knotless Box Braids Suitable For?
Knotless box braids are an excellent hairstyle for all hair types, but coarser hair types may hold the style better and for longer periods.
Coarser hair ranging from 3C to 4A is not only strong enough to withstand the tension of the hairstyle, but the coarse texture of the hair can also stay fresh within the style longer. Looser hair types may slip out of the braids more easily.
Also, knotless braids are terrific for sensitive scalps. The hairstyle’s low tension means you are less likely to suffer from a sore scalp during or after installation.
When to Wear Knotless Box Braids?
Knotless braids are a good hairstyle that can and are worn year-round.
Pros and cons of Knotless Braids
Pros of Knotless Box Braids
Getting knotless box braids comes with many pros, including the fact that they are virtually painless. One of the biggest problems with getting traditional box braids is the constant tugging on your scalp when getting them done and the throbbing headache you are sure to get once they are finished.
- Since they do not use a knot to be attached to the natural hair, knotless box braids result in no painful tugging on the scalp. As such, this protective style is great for tender-headed individuals.
- Another benefit of getting knotless box braids is that they are not heavy. Given that they use a more subtle feed-in technique that requires hair to be fed into the braid going in a downward direction, knotless box braids tend to be less bulky compared to traditional box braids.
- This feed-in technique also makes your knotless box braids look effortlessly natural and seamless, guaranteeing compliments being thrown at you left and right!
- Like many other braided protective styles, knotless box braids are also very versatile. Be it in a high bun, and middle part, or braided crown, knotless box braids can be used to create several different hairstyles. Further, you can get them in just about any shape, size, and color!
- Although you may end up spending a pretty penny on having them installed, knotless braids save you money spent on braiding hair. The feed-in method often requires less braiding hair than traditional box braids, thus trimming down on the amount of hair you have to buy for your installation.
- Lastly, knotless box braids also cause no major breakage, unlike other hairstyles. Besides preserving your edges, the knotless technique used warrants less tugging on your hair as well as less friction at your scalp, resulting in lower chances of breakage and less overall shedding.
Cons of Knotless Box Braids
Though they have several benefits, knotless box braids also come with a couple of cons as well—one being the installation time.
- Knotless box braids can take upwards of 6 hours, depending on the hairstylist of course. If you decide to get this style, be sure to pack a snack or two as you will most likely be in the shop all day.
- Knotless box braids can also be more expensive to get compared to other protective hairstyles. With an average price of about $150, knotless box braids take the cake when it comes to loaded price tags. However, given the additional time it takes to do this style, the price jump is justified.
Are you ready to have your knotless braids installed? Let’s find your hairstylist! You can use our site to help find the perfect hairstylist for you. With Ebena’s fast booking tool, booking a hairstylist is now faster and more efficient than ever!